

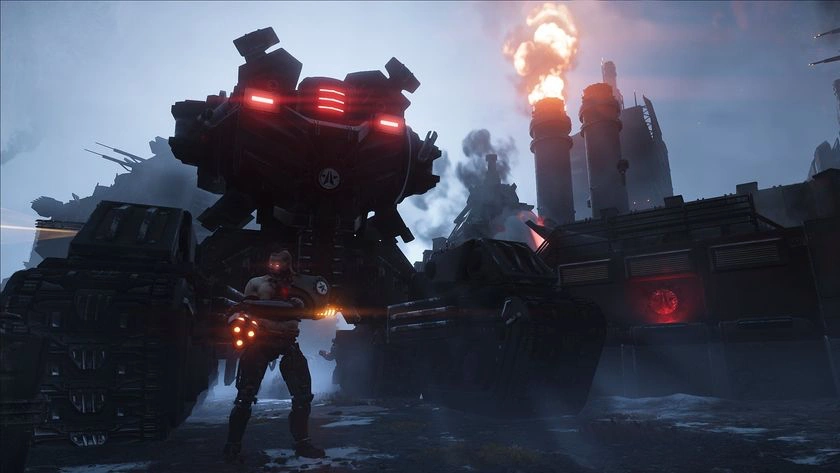
Cyberstan’s factory cities feel different from the moment you land. Sightlines are tighter, sound cues are louder, and fights stack on top of each other. A patrol turns into an alarm, an alarm turns into a swarm, and suddenly your squad is burning reinforcements while trying to understand what even hit them.
That shift comes from three new Cyborg threats that don’t play like regular Automaton crowds. Agitators shape the whole battle by keeping enemy squads “on script.” Radicals punish slow reactions and bad spacing. Vox Engines force you to solve a moving heavy target while everything else keeps pressuring your angles.
This article is a focused combat guide. It stays on those three enemies only. You’ll learn how to identify each one fast, where their weak spots are, how to call priority targets in a random squad, and how to end Vox Engine fights with a method you can repeat under stress.
Why Do Cyborgs Feel Harder on Cyberstan in Helldivers 2?
The main reason Cyborgs feel harder is that they punish “normal” habits.
On many missions you can win by staying aggressive, clearing whatever is closest, and letting stratagems carry the rest. Cyberstan fights often punish that flow. These three enemies create pressure that spreads across the whole squad:
- Agitators keep the enemy push coordinated, which increases the chance you get pinned and lose your exits.
- Radicals force you to defend your personal space. They turn small mistakes into downed teammates.
- Vox Engines control lanes and keep you from playing wide, open angles.
Another reason is pacing. Factory-city combat gives you less time to reset. You take a hit, you try to heal, someone gets rushed, then the whole squad is busy reacting. If your team doesn’t remove the “driver” enemy first, the fight stays in the danger zone for too long.
A useful way to think about it is simple: Cyborgs don’t only deal damage. They create bad decisions. Your job is to remove the unit that is causing those decisions.
Buy services for
Helldivers 2!
Get help with the parts of the game that take the most time. Browse available services or place a custom order.
Order
Which Cyborg Enemy Should You Kill First: Agitator, Radical, or Vox Engine?
You can win a lot of Cyberstan fights with one consistent priority rule:
Agitator → Radicals → Vox Engine (solve it by vents).
That might sound surprising because the Vox Engine is the scariest-looking target, but squads wipe more often because they ignore the infantry pressure that breaks spacing and forces messy revives.
Here’s the quick priority chart again, with slightly more context:
| Enemy | What it does to your squad | What it “feels like” in-game | Priority |
|---|---|---|---|
| Agitator | Makes nearby enemies more dangerous and organized | The fight stops being random and starts being oppressive | High |
| Radical | Rushes close and breaks spacing | You’re always one step behind the push | High |
| Vox Engine | Heavy target that locks lanes | You can’t stand in the open for even a second | Highest when present |
The way to apply this in real missions is not “ignore the Vox Engine.” It’s “stabilize the ground first.” If Radicals are in your face and an Agitator is driving the pack, your Vox Engine solve will fail because you won’t get clean angles on vents.
If you play with randoms, target priority lives or dies on clarity. A short callout works better than a paragraph.
What Is the Cyborg Weak Spot in Helldivers 2?
For Cyborg infantry, the most reliable weak point is the flashing red generator on the chest.
That weak spot matters because it changes your time-to-kill. When you land chest shots, fights get shorter. Shorter fights mean fewer reinforcements used, fewer desperate reloads, and fewer “revive chains” where one down leads to two more.
Why players miss it in live fights
In Cyberstan cities, targets move through clutter. You get smoke, lights, metal frames, and enemy bodies stacked in tight groups. It becomes easy to aim at whatever piece is visible—an arm, a shoulder, a helmet—then wonder why the enemy keeps coming.
The chest generator is the solution because it is consistent. It’s in the same place. It rewards calm aim. It also works with a lot of different weapons because you’re hitting center mass instead of trying to thread headshots in a crowd.
Two aiming habits that make it “automatic”
First, keep your crosshair at chest height while you move. If your aim is floating too high or too low, you waste time correcting when the rush starts.
Second, commit to a target until it drops. Switching targets every half-second looks active, but it stretches the fight and increases the chance a Radical reaches you.
One practical tip for squads: when someone pings a Cyborg infantry unit, treat that ping as a chest-weak-spot reminder. You don’t need perfect coordination. You need everyone aiming at the same place.
How Do You Kill an Agitator Fast in Helldivers 2?
Agitators are commanders. They don’t only exist to soak bullets. Their job is to keep the enemy pack dangerous for longer than it should be.
When an Agitator is alive, you often notice three things:
- Enemies keep pushing even when you think you “won” the first exchange.
- Your squad gets pinned more easily because pressure comes from multiple angles.
- The fight feels like it has no clean reset window.
To kill an Agitator fast, you want a simple loop that works in chaos.
The Agitator kill loop (what to do every time)
Mark it, create a lane, strip armor, finish chest.
That’s the whole idea. The difference between a clean kill and a long messy fight is the “create a lane” part. If you chase an Agitator into clutter, you give up aim. You also give up your exit routes. That’s how reinforcements vanish.
Instead, step back into a spot where you can aim without bodies blocking your line. Let the pack walk into you. When the Agitator is visible and you can keep your reticle stable, the armor break happens quickly.
Armor stripping: what it really means
Players often imagine “armor stripping” as a fancy mechanic. In practice, it means you are dealing enough effective damage that the target stops acting like a sponge. Some weapons will chip plates slowly. Others will punch through more cleanly. The important part is consistency: keep pressure on the same area until the chest weak point becomes a reliable finish.
Once you can see and hit the red chest generator, don’t drift back into shooting arms and legs. This is where many squads lose time. They get the weak spot available, then panic and spray.
How to survive the commander while you kill it
Agitators are deadly because they attract attention. While you focus them, the rest of the pack tries to close. If you feel “surrounded,” it usually means you stayed in one position too long.
A simple movement rule helps: fire, step, fire. Small side steps and short resets behind cover keep you alive without breaking your aim. You don’t need a long retreat, just enough to avoid being boxed.
If you’re in a duo role situation, it becomes even easier: one player peels the crowd and buys space, the other stays locked on the commander. Even without voice chat, this often happens naturally when one player chooses the “big target” and the other cleans.
How Do You Counter Radicals in Helldivers 2?
Radicals are the enemy that makes Cyberstan feel personal. They rush in and turn a clean firing line into a close-range scramble.
The best way to understand Radicals is to think of them as a timer. You have a short window to kill them at range. If you miss that window, the fight changes: reloads become dangerous, revives become dangerous, and you start taking hits while trying to reposition.
The Radical counter is spacing, not bravery
A lot of wipes come from squads trying to “hold ground” in the worst possible place. The classic example is a doorway. Doorways feel safe because you can funnel enemies, but Radicals punish funnels because they create body stacks. When the stack hits, your squad blocks itself. People can’t aim. People can’t dodge. Someone goes down.
You want space that lets you step sideways, not only backward.
If you notice Radicals appearing, your first thought should be: “Where is my room?”
A room means you have lateral movement and at least one second exit if the push continues.
The key aiming detail with Radicals
You don’t need to outplay Radicals with fancy shots. You need to put damage into the red chest generator quickly. Center mass aim is the most stable solution because Radicals move fast and don’t give you clean headshot lines.
When Radicals reach the last few meters, the goal shifts. You are no longer “winning the gunfight.” You are preventing a down. At that point, fast handling and fast reactions matter most. Use whatever option lets you keep damage on center mass while you move.
What to do when a teammate gets rushed
This is where squads lose reinforcements in chains. One teammate gets pushed, they go down, and now the rest of the team steps forward into the same danger zone to revive.
A safer pattern:
- Clear the immediate rush first.
- Then revive from a position that keeps your cover and exits.
- If you can’t do it safely, reset the line and come back.
That may feel slower, but it’s faster than losing two more players to the same push.
What Are Vox Engine Weak Points in Helldivers 2?
The Vox Engine is a heavy war machine. It controls space with loud firepower and forces you to play tighter, smarter angles.
The most important thing to understand is that the Vox Engine isn’t meant to be killed by random damage into random armor. It has clear weak points that show you you’re doing the right thing.
The weak points are glowing orange heat vents.
You can think of those vents as its “systems.” When you break the right vents, the Vox Engine becomes vulnerable in a way you can actually capitalize on.
In live fights, you won’t always see every vent at once. Sometimes you’ll see lower chassis vents. Sometimes you’ll rotate behind and see back vents. Sometimes you’ll get a higher angle and spot vents near the rear head area.
Don’t overcomplicate it. Your job is to find a safe angle where you can see one set of orange vents clearly and keep shots on them.
If you can’t see vents, move. When squads fail Vox fights, it’s often because they stand in a bad lane and keep firing “because we’re already committed.” That burns time and ammo while the Vox keeps controlling the map.
Buy services for
Helldivers 2!
Get help with the parts of the game that take the most time. Browse available services or place a custom order.
Order
What Is the Fastest Way to Kill a Vox Engine?
The fastest method is a short sequence you can repeat even when your team is under pressure:
Break vents → open the hatch/compartment → throw an explosive inside.
You are not trying to “out-DPS” a tank. You are trying to create a finish window.
Sometimes you have multiple heavy threats, or infantry pressure is too high to step out for a clean throw. In those moments, the correct move is to slow down and keep the pocket alive.
Your priority becomes:
- Keep vent pressure when safe.
- Keep the squad stable so the vent shooter can work.
- Use larger tools only when they can be deployed without exposing the team.
The Vox Engine becomes manageable when your squad treats it like a problem to solve, not a target to brute-force.
What Weapon Traits Work Best Against Cyborgs?
You can beat these enemies with many builds. The difference is whether your build has the traits that match the problem.
Agitators require armor break and reliable chest finishes.
Radicals require fast handling and close-range stability.
Vox Engines require consistent vent pressure and a reliable finish option.
Instead of listing dozens of weapons, here are the traits that matter most:
- Medium penetration: helps against armor plates and keeps damage meaningful.
- Explosive pressure: speeds up armor break and helps finish heavy targets.
- Fast handling: makes close-range Radical fights less chaotic.
- Consistency: weapons you can control under stress beat “theoretical DPS.”
If your squad struggles, the easiest fix is role coverage. Make sure someone can solve Vox Engines, and make sure at least one player can stop rushes quickly. That alone makes Cyberstan feel fairer.
What Positioning Tips Stop Cyborg Wipes in Factory Cities?
Positioning is the hidden skill check of Cyberstan. These fights punish squads that stand still and punish squads that retreat into dead ends.
The best positioning is simple: space, exits, and cover pockets.
A few rules that stay true across missions:
- Keep at least one second exit in mind before you commit to a hold. Radicals punish dead ends.
- Pull commanders into lanes where you can aim. Chasing Agitators into clutter costs more than it gains.
- Fight Vox Engines from a pocket. The tank wins open lanes and loses controlled pockets.
- Revive after you stabilize. A risky revive is a common reason squads lose two reinforcements instead of one.
You don’t need to play perfectly. You need to play repeatably. Small consistent movements beat dramatic retreats.
What Mistakes Get Squads Killed by Cyborgs?
Most deaths come from three repeat mistakes: poor target priority, poor spacing, and poor Vox Engine approach.
Here are the fixes that actually change outcomes:
- If the fight feels “endless,” look for the Agitator and remove it first.
- If you keep getting downed at close range, stop taking stands in doorways and corners. Give yourself lateral space.
- If a Vox Engine is chewing through your team, stop brute forcing armor and start working vents from cover.
You’ll notice a theme: you win by making the fight smaller and cleaner. You don’t win by trying to out-chaos the chaos.
Helldivers 2 Cyborg FAQ: Weak Spots, Counters, Vox Engine Tips
Buy services for
Helldivers 2!
Get help with the parts of the game that take the most time. Browse available services or place a custom order.
Order
What One-Line Kill Order Saves Reinforcements on Cyberstan?
This order works because it removes the three things that drain reinforcements fastest: coordination pressure, close-range collapses, and lane control.
Agitator first because it acts like a force multiplier. When it’s alive, the fight stays “organized” against you. You spend more time pinned, more time reloading under fire, and more time trying to revive while enemies keep pushing. Killing the Agitator doesn’t just remove one target. It makes everything around it easier to manage.
Radicals next because they punish hesitation. If you let them reach your line, your squad starts trading downs instead of trading damage. That’s where reinforcement losses spike: one player goes down, two players step forward to revive, and the rush hits again. Clearing Radicals resets your spacing so your team can breathe for a moment.
Vox Engine last (but solved fast) because it’s a problem you need stable ground for. The vents/hatch method needs a clean angle and a few seconds of focus. If Radicals are still rushing and an Agitator is driving the pack, you won’t keep your reticle on vents long enough, and you’ll end up brute-forcing armor while the Vox controls the lane. That’s how “one tank” becomes a full wipe.
When you keep this order, fights become predictable. You still get pressure, but you control how that pressure grows. That’s the difference between a clean extract and a mission that collapses in the last two minutes.