

Marathon is Bungie’s extraction shooter, and it’s unlike anything they’ve made before. You drop onto Tau Ceti IV — a hostile alien colony — as a cybernetic mercenary called a Runner. Your job: loot, survive, and get out alive. Die, and you lose everything you brought in. Extract successfully, and you keep it all.
The game launched on March 5, 2026 for PS5, Xbox Series X/S, and PC at $40. There’s no campaign. The story plays out through seasons, contracts, and the world itself. Three players per squad, real enemy teams hunting you, AI forces trying to kill everyone, and a clock that never stops. That’s Marathon.
This guide covers the four things you need to understand before your first run: the maps, the Runner Shells, the weapons, and how progression actually works — including what you keep and what you lose.
Buy services for
Marathon!
Get help with the parts of the game that take the most time. Browse available services or place a custom order.
Order
Marathon Maps Explained: Every Zone, Risk Level, and What to Expect
At launch, Marathon has four zones. Three are available from day one, and the fourth unlocks through community progress. Each one plays completely differently, and running the wrong zone too early is a fast way to lose your best gear.
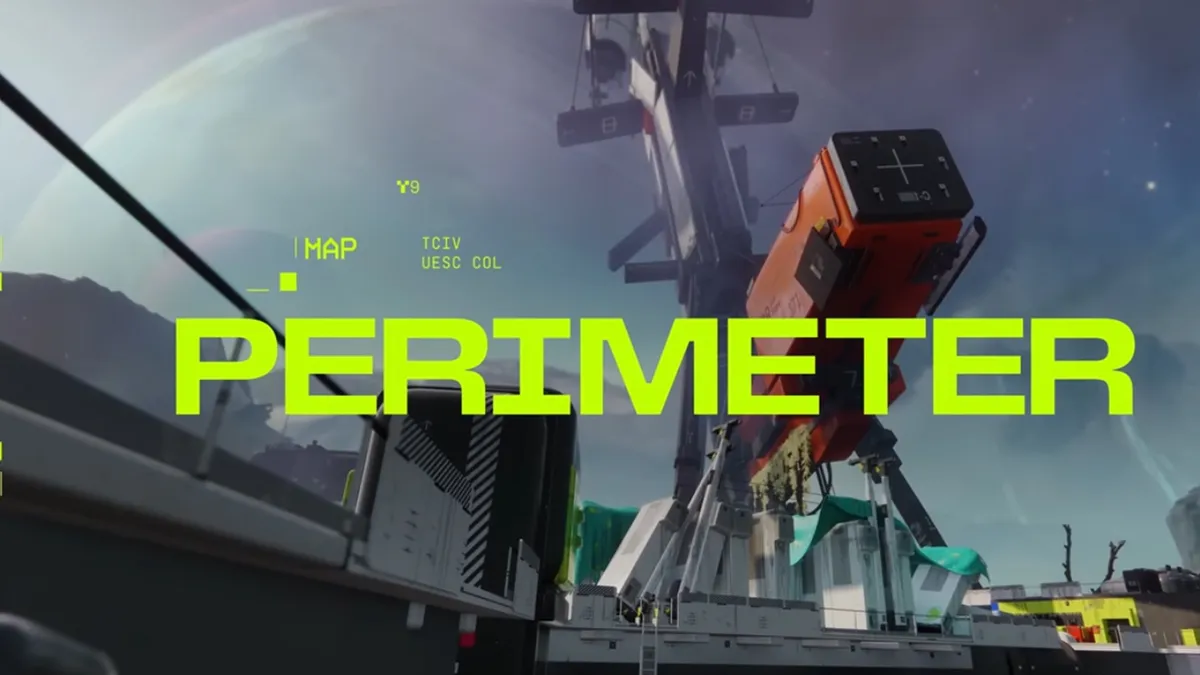
Perimeter — Best Starting Zone for New Players
Perimeter sits on the outskirts of the New Cascadia colony. It’s slower, more open, and gives you more room to breathe between encounters. There are stealth paths, quieter corners for looting, and a lower concentration of high-tier enemies compared to the later zones.
This is where you learn the loop. If you’re still figuring out when to push fights and when to run, start here.
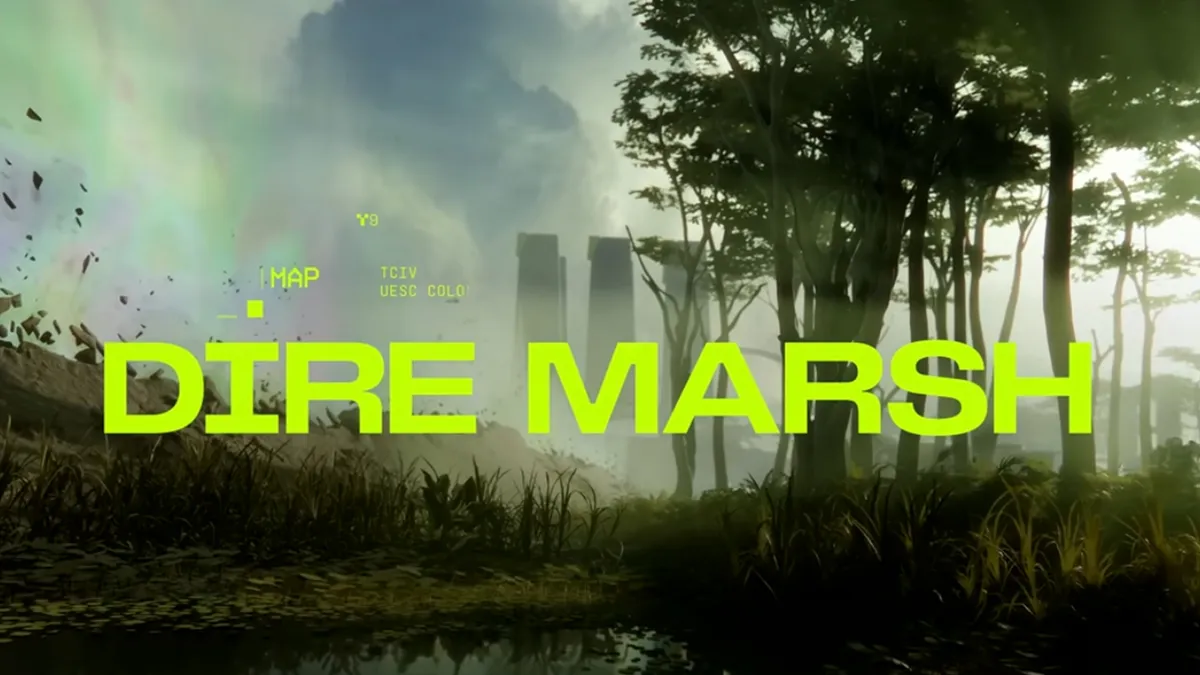
Dire Marsh — Mid-Game Farming Zone
Dire Marsh is built around a central disaster-hit complex surrounded by marshland. The open terrain limits visibility, which makes flanking common and predictable sightlines rare. It’s more chaotic than Perimeter by design.
The zone hosts a dropship event — high-risk, high-reward. When it triggers, expect every squad in the zone to converge. The loot is some of the best you’ll find outside the endgame, but so is the competition.

Outpost — Vertical, High-Pressure, and Locked Until Level 12
Outpost was a logistics and staging hub before the colony collapse. Now it’s a tight, vertical map centered around a fortified structure called the Pinwheel. Every encounter here happens in close quarters — hallways, elevated platforms, and overlapping sightlines.
This zone unlocks one day after launch (March 6) and requires Runner Level 12 to access. The loot quality jumps significantly compared to Perimeter and Dire Marsh, but passive play will get you killed fast. Outpost rewards aggressive, coordinated teams.
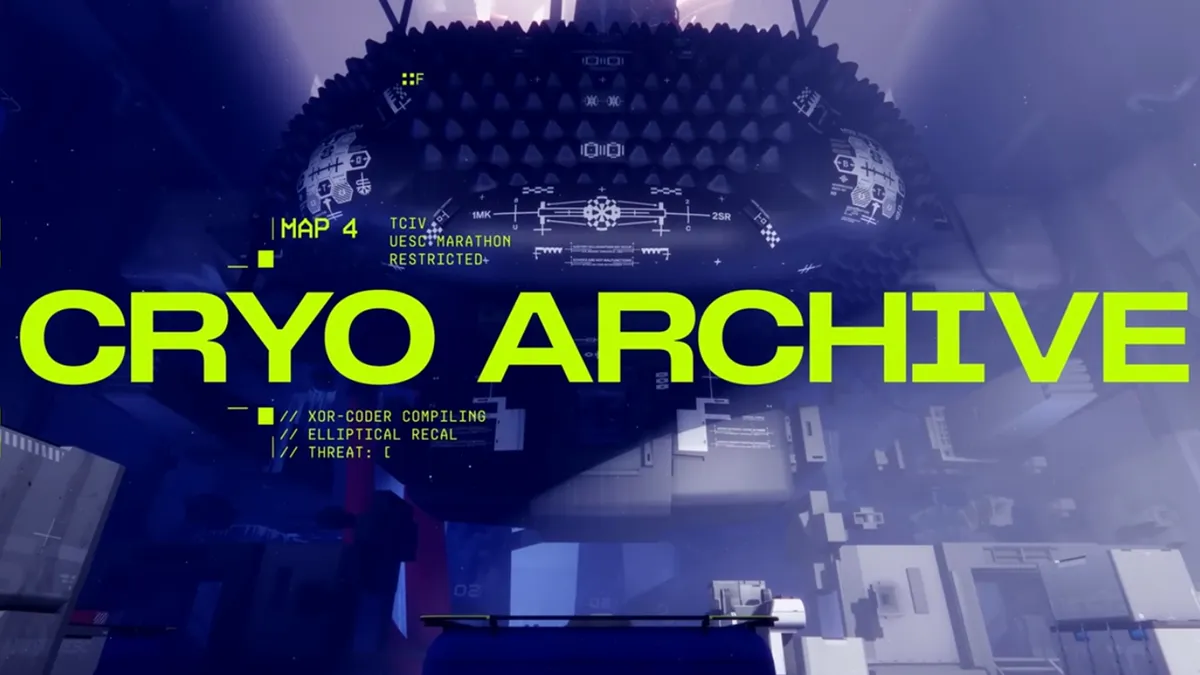
Cryo Archive — The Endgame Zone Aboard the UESC Marathon
Cryo Archive is the fourth zone and the hardest. It’s set aboard the derelict UESC Marathon ship, with frozen hallways, cryopods, medical bays, and security puzzle sections that play more like a raid than a standard extraction run. The enemies here are the toughest in the game, and every environmental hazard from the other three zones appears in some form.
This zone unlocks mid-March once the community collectively progresses far enough to reach the ship — Bungie confirmed it’s tied to a community-wide threshold. Cryo Archive is not a place to bring a half-built loadout.
| Zone | Difficulty | Unlock Condition | Best For |
|---|---|---|---|
| Low | Perimeter | Available at launch | Learning the game, early loot |
| Dire Marsh | Medium | Available at launch | Mid-game farming, events |
| Outpost | High | Runner Level 12 (March 6) | Coordinated teams, strong loadouts |
| Cryo Archive | Endgame | Community unlock (~mid-March) | Endgame teams, best loot in the game |
All Marathon Runner Shells: Abilities, Playstyles, and Who They're For
Runner Shells are Marathon’s class system. Each one comes with a Prime ability (your ultimate), a Tactical ability, and two Traits. On top of that, you can slot in Cores and Implants to push each Shell further in different directions — two players running the same Shell can feel completely different depending on their build.
There are seven Shells at launch.
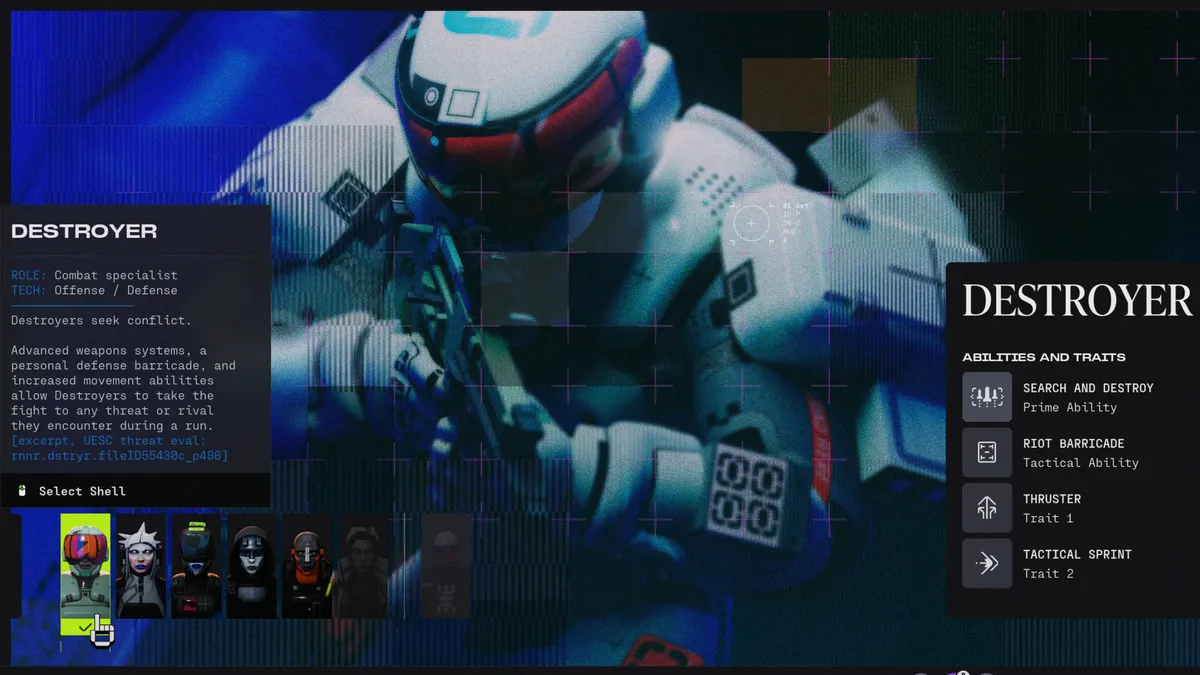
Destroyer — The Frontline Brawler
Destroyer is built for direct combat. Its Tactical ability, Riot Barricade, spawns an energy shield to block incoming fire — useful for holding ground or giving teammates room to reposition. The Prime, Search & Destroy, fires homing missiles that chase targets and immobilize them.
Built-in Thrusters let Destroyer close distance fast. It’s the most straightforward Shell in the game, but there’s real skill ceiling in knowing when to push behind the barricade and when to hold it.
Best for: players who want to lead the charge and anchor team fights.
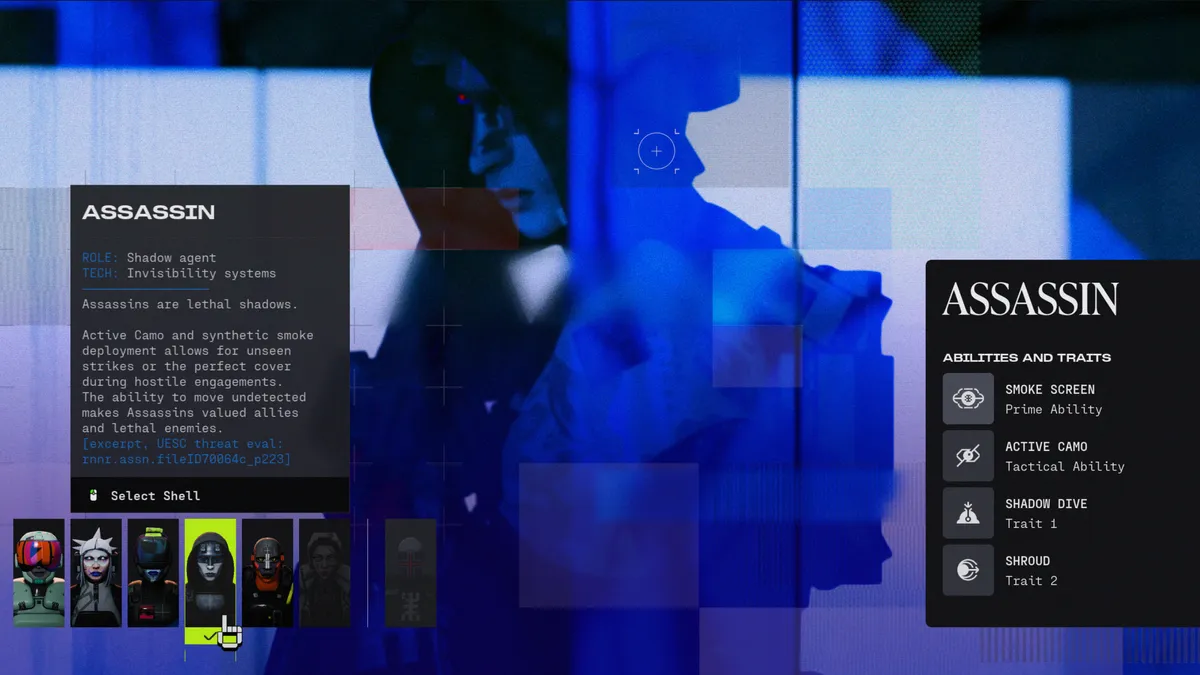
Assassin — Stealth and Disruption
Assassin uses smoke and invisibility to control fights from the shadows. Active Camo makes you temporarily invisible, though it cancels immediately if you use any other action. The Prime, Smoke Screen, throws down a disc that cuts enemy sightlines. The Shroud Trait takes it further — you turn invisible by default while standing inside your own smoke.
Shadow Dive lets you drop into a dive and create a new smoke field on landing, which chains well with the rest of the kit.
Best for: solo flankers, backline disruptors, and players who want to dictate when fights happen.
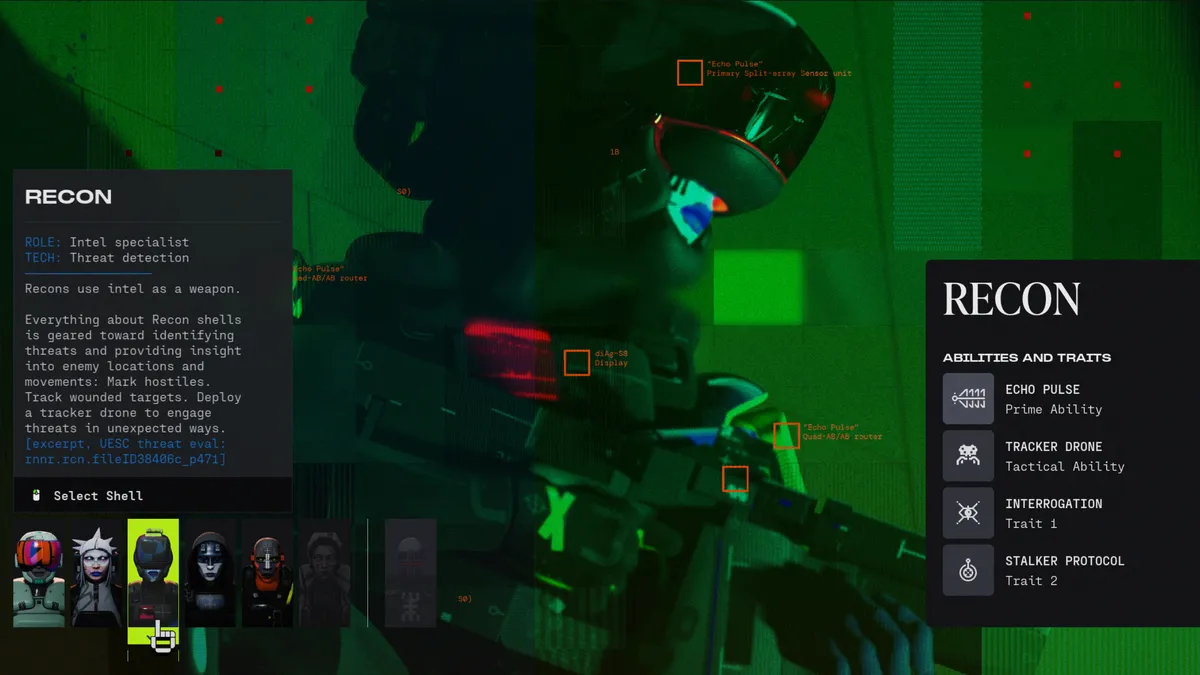
Recon — Intel Specialist
Recon doesn’t dominate fights with raw power — it dominates them with information. Echo Pulse sends out sonar pulses that reveal every nearby enemy, including invisible ones. Tracker Drone tosses a spider-like bot that attaches to enemies, explodes, and overheats them — drastically limiting their movement and dealing burn damage.
The Interrogation Trait adds another layer: whenever an enemy pings you, you get a HUD alert. Finish an enemy player, and their teammates get pinged automatically.
Recon only works if you actually call out positions. In a coordinated squad, it’s probably the most impactful Shell in the game.
Best for: team anchors, shot callers, and squads that communicate.
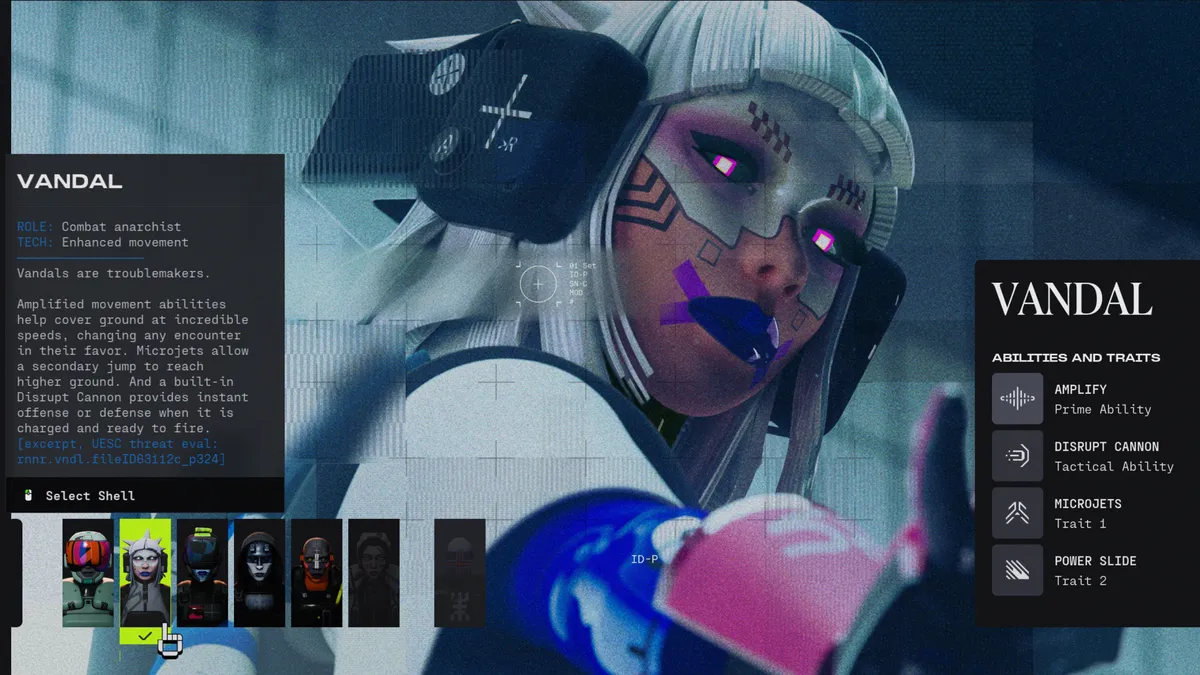
Vandal — Mobility and Chaos
Vandal moves differently from every other Shell. Built-in Microjets enable a double jump. The Power Slide covers more ground faster than any other Shell. The Disruptor arm cannon fires kinetic blasts that push enemies out of cover, off ledges, or even launch Vandal players themselves into the air when fired downward.
The Prime, Amplify, boosts movement speed and weapon handling while cutting heat generation from movement abilities — which lets you chain repositions without overheating.
The catch is heat management. Double jumps and power slides generate heat, and overheating briefly locks you out of abilities. Vandal players who don’t manage it well lose their biggest advantage.
Best for: aggressive repositioning, PvP pressure, hit-and-run tactics.
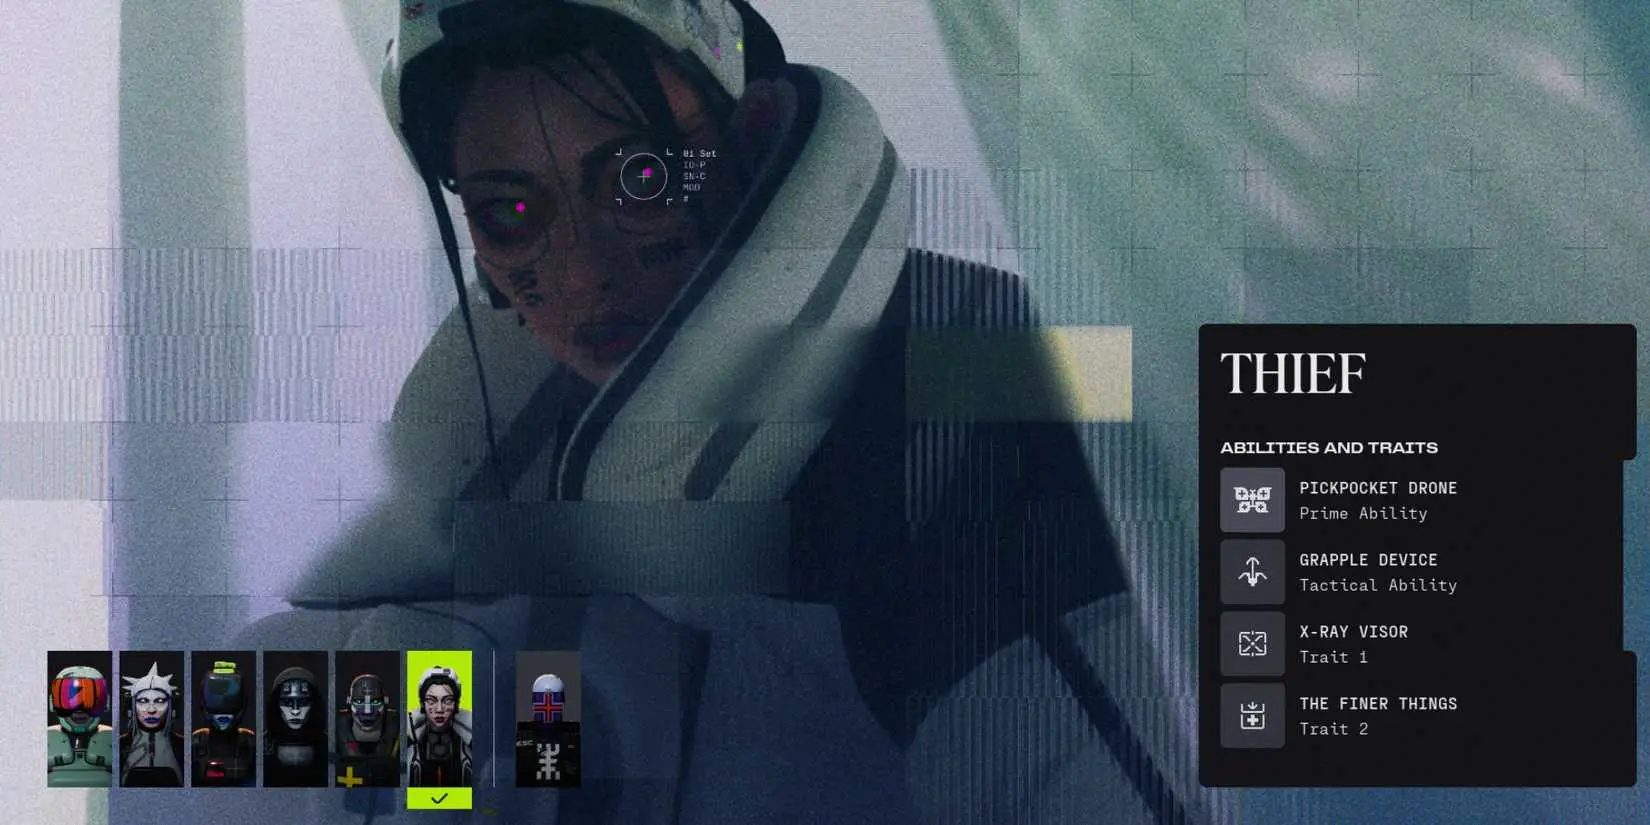
Thief — The Loot Specialist
Bungie calls Thief the “loot goblin” Shell, and it earns the title. Its Grapple Device hooks onto targets and surfaces from a distance, giving it the best traversal in the game. The Pickpocket Drone is a butterfly-shaped scout that scans environments for loot, highlights containers through walls, and can steal the rarest item from an enemy’s inventory.
The X-Ray Visor Trait highlights enemies and containers in the color of the most valuable item they hold. The Finer Things Trait passively improves weapon handling and grapple recharge rate the fuller your backpack gets.
Thief isn’t built for prolonged fights, but it’s unmatched for finding and securing valuable gear before anyone else does.
Best for: loot-focused players, extraction specialists, advanced solo runs.
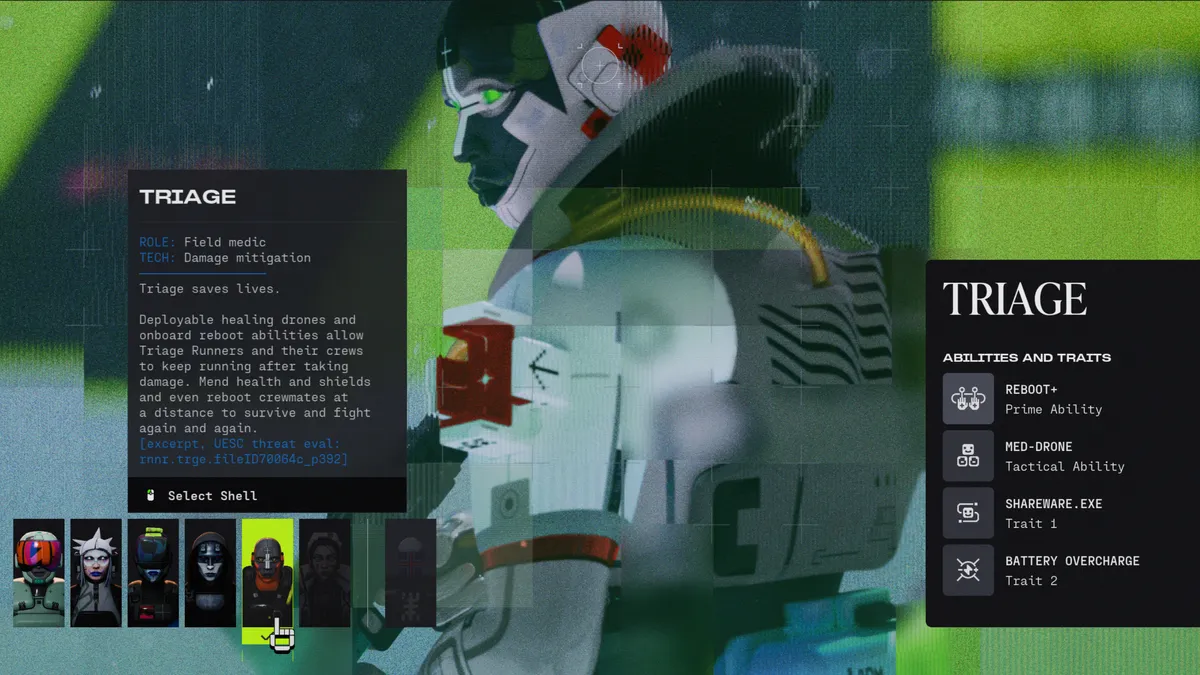
Triage — The Medic
Triage is the only Shell that actively sustains teammates mid-fight. The Med-Drone deploys a floating drone that attaches to squad members, restoring health and shields and preventing them from bleeding out when downed. The Prime, Reboot+, fires a defibrillator device that can instantly revive allies from range — or EMP enemies in a pinch.
Shareware.EXE is the Trait that makes Triage genuinely powerful: when you use a healing consumable, every teammate with a Med-Drone attached gets the same effect. One med kit becomes three.
Battery Overcharge boosts weapon performance at the cost of extra heat, and breaking an enemy’s shield with a volt weapon during this state triggers an EMP.
Best for: trio squads running coordinated setups, players who enjoy support roles with real combat presence.
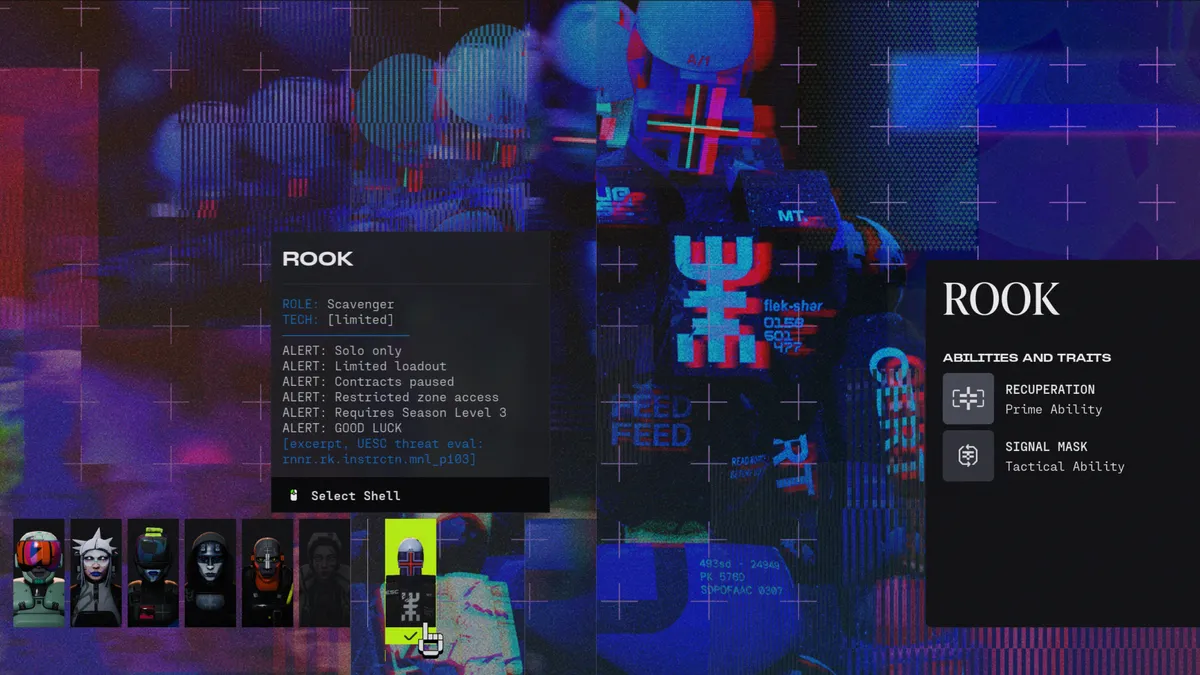
Rook — The Scavenger Frame
Rook is its own thing. It’s a stripped-down solo-only Shell that joins matches already in progress with no vault gear and no risk. You drop in with a basic starter kit, pick up loot during the remaining time, and extract. Rook can’t bring anything in, so there’s nothing to lose if you die.
The key ability is Signal Mask, a Tactical that lets you temporarily blend in with UESC AI forces — they ignore you completely as long as you don’t sprint or take damage. This lets you move through fortified zones and grab loot undetected.
You need to reach Season Level 3 to unlock Rook. Once unlocked, it’s the safest way to learn map layouts, practice loot routes, or restock after a bad run. Just remember: you’ll be solo against squads of three.
Best for: beginners, map learning, low-risk restocking runs.
Marathon Weapons Guide: All 28 Guns, Ammo Types, and Rarity System
Marathon launches with 28 weapons across eight categories: Assault Rifles, SMGs, Shotguns, Precision Rifles, Machine Guns, Railguns, Sniper Rifles, and Pistols. Every weapon you bring into a zone is at risk — die without extracting, and it’s gone.
Weapon Categories at a Glance
- Assault Rifles — the most versatile class, effective at mid-range in most situations. The M77 AR is the all-rounder go-to; the Overrun AR runs at 720 RPM for constant close-to-mid pressure. The Impact HAR hits harder but requires recoil management.
- SMGs — built for close-range aggression. The BRRT SMG fires in five-round bursts and was the most popular pick in the Server Slam. The Bully SMG hits harder per shot but burns Heavy Rounds quickly.
- Shotguns — point-blank dominance. The WSTR Combat Shotgun is a double-barrel that dumps two shots in rapid succession — one blast at close range can eliminate a Runner outright. The Misriah 2442 is more forgiving at slightly longer range.
- Precision Rifles — mid-to-long range control. The Stryder M1T (functionally similar to Bungie’s own MIDA Multitool) and Hardline PR are both strong picks here.
- Sniper Rifles — the Longshot is the top pick for open engagements; the Outland handles single-shot precision at the highest damage per hit.
- Railguns — the hardest-hitting category, powered by Volt Cells. The Ares RG is the strongest when ammo is available, but Volt ammo is scarce and shared with other Volt weapons.
- LMGs — area control and suppression. The Retaliator LMG and Conquest LMG both favor holding positions over aggressive play.
- Pistols/Sidearms — situational backups. The CE Tactical fires at 600 RPM and has a secondary charged laser mode; the Magnum hits hard but fires slowly at 138 RPM.
Ammo Types
There are five ammo types in Marathon, and running two weapons in the same ammo class means they share the same pool:
| Ammo Type | Used By |
|---|---|
| Light Rounds | Most SMGs, some ARs, sidearms |
| Heavy Rounds | LMGs, some ARs and SMGs |
| MIPS | Shotguns and some sniper variants |
| Volt Battery | Volt-based ARs and SMGs |
| Volt Cells | Railguns |
Volt weapons have one hard rule: reloading with shots remaining in the battery wastes the leftover charge. Always fire to empty before reloading.
Weapon Rarity
Every weapon in Marathon exists on a five-tier rarity scale. Higher rarity means better pre-slotted mods, stronger Chip Mod perks, and higher credit value on extraction.
| Rarity | Color | What It Means |
|---|---|---|
| Standard | Gray | Base stats, minimal mods |
| Enhanced | Green | Slightly better mods |
| Deluxe | Blue | Improved attachments |
| Superior | Purple | Strong pre-slotted perks |
| Prestige | Gold | Best stats, unique Chip Mod perks |
A Prestige-tier weapon can have completely different behavior than its Standard version. The CE Tactical at Prestige rarity, for example, grants invisibility on reload after a kill — a perk that doesn’t exist at any lower tier.
Mod System
Each weapon supports three to four mod slots: Barrel, Magazine, Grip, Optics, Chip Mod (on every weapon), and Shield (LMGs only). Mods can be stripped from weapons and transferred to others, so always pull good mods before extracting even if you’re dropping the gun itself.
The most consistent advice: figure out what your weapon is weak at and fill that gap. Stability mods on SMGs and reload mods on shotguns tend to produce better results than stacking raw damage upgrades.
Marathon Progression System: How Factions, Seasons, and Wipes Actually Work
Progression in Marathon runs on a seasonal model, and understanding it from the start will save you a lot of frustration.
The Core Loop
Every run you take is a faction contract. Completing objectives earns faction XP and in-game credits. Raise your faction level and you unlock permanent upgrade trees for your Runner Shell, access better Armory options, and unlock pre-packaged loadout kits — gear sets that let you drop in with decent equipment without risking your vault.
There are six factions at launch, each with their own contracts, reputation tracks, and upgrade trees. You start with one faction and permanently unlock the others by completing Liaison Contracts — specific intro quests that only need to be done once, ever. After that, all six are available every season.
What a Seasonal Wipe Resets
At the end of every season, Bungie runs a full server wipe. This is not optional. Here’s exactly what goes and what stays:
Resets every season:
- All extracted gear in your vault
- Equipped weapons, implants, and mods
- Faction rank and seasonal upgrades
- Player level and season level
- All in-game currency balances
Carries over permanently:
- Earned and paid cosmetics
- Titles
- Codex progression and achievements
- Liaison contract progress (faction unlocks)
The goal is that every season starts on a level playing field. Nobody enters a new season with a stacked vault of Prestige weapons — everyone grinds back up from the same baseline. It also creates a specific dynamic at the end of each season: since your gear is about to disappear anyway, the last few weeks of a season tend to get chaotic as players burn through everything they’ve saved.
Season 1: Death Is the First Step (March – June 2026)
Season 1 launches alongside the game and runs through late May/early June. The season introduces the full faction system including Sekiguchi Genetics, which wasn’t available in the Server Slam. Cryo Archive unlocks mid-March once the community reaches the UESC Marathon ship. Ranked Mode also arrives mid-March with its own seasonal rewards.
Additional Season 1 content includes new Implants, a new weapon, quality-of-life updates, balance patches, and the C.A.R.R.I. limited-time event.
Season 2: Nightfall (June – August 2026)
Season 2 is when the first server wipe happens. UESC security escalates across all zones. Content additions include:
- A nighttime version of Dire Marsh with new zone conditions
- A new Runner Shell (Sentinel)
- New weapons, mods, cores, and contracts
- The Cradle system — a new layer of Shell customization that gives players direct control over their Runner’s statistical strengths and weaknesses
Buy services for
Marathon!
Get help with the parts of the game that take the most time. Browse available services or place a custom order.
Order
8 Quick Tips Before Your First Run in Marathon
Getting into the extraction loop without any context is the fastest way to lose gear you spent hours finding. A few things to know before you drop:
- Start on Perimeter — it’s slower, more forgiving, and gives you time to understand the flow of a run without dying to squads who’ve already been playing for days
- Use Rook first if you want to learn maps risk-free — you lose nothing, and learning where loot spawns before you bring real gear is genuinely valuable
- Pull mods before you extract — mods transfer between guns and are often worth more than the weapon itself at lower rarities
- Don’t run two weapons with the same ammo type unless you’re running events specifically to farm that ammo
- Wait for Volt weapons to fully empty before reloading — reloading early wastes whatever charge is left
- Complete map events like Lockdown and Priority Targets — they’re the most reliable source of high-rarity drops, Cores, and Implants outside of vault gear
- Prioritize faction contracts early — unlocking upgrade trees fast raises your power floor before the season’s mid-point competition heats up
- Don’t take your best gear to Outpost or Cryo Archive until you’ve run them enough to know the layout — a confident team that knows the map beats a better-geared team that doesn’t every time