











H1000 is the boss that finally broke the old AZ3 routine. Every other Operations boss in Delta Force sits in one room and waits for you to walk in. H1000 doesn’t wait. He hunts. This guide covers exactly where he spawns, how the fight plays out phase by phase, what his kit actually does, and how to walk away with the loot instead of a wipe screen.
If you’ve already lost a squad to that flying kick, you know why this fight gets talked about so much. It’s not a gear check. It’s a positioning check, and most squads fail it because they treat H1000 like every other Warlord before him.
What Is H1000 in Delta Force AZ3?
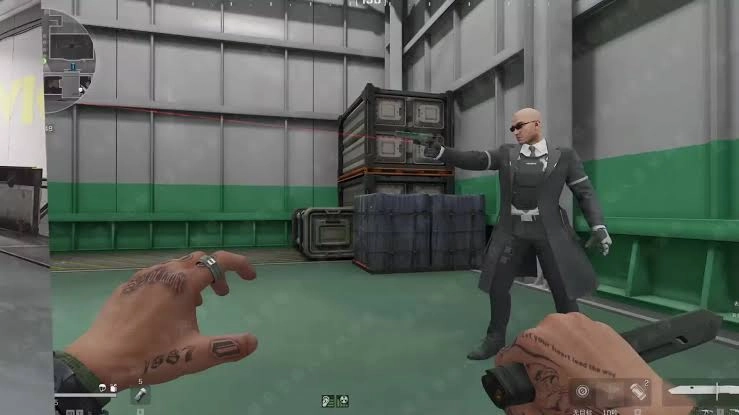
H1000 is a Neural Device agent, nicknamed “The Destroyer” inside the AZ3 storyline. Haavk rebuilt him with brain-machine tech tied to the same Neural Device and Skynet systems that show up across AZ3’s lore, and that rebuild is exactly why he moves and reacts nothing like the older bosses on the map. He’s a Warlord-tier threat, which puts him a full step above the guard-type enemies you’re used to fighting on other Operations maps.
You’ll recognize him fast once you see him. He’s bald, dressed in a suit, wears sunglasses, and has an exposed interface built into his head. A glowing bio-symbol sits on his chest, visible even through smoke or at range. That symbol isn’t just cosmetic. It marks his main weak point, and clean headshots on top of it punish him faster than body shots ever will. Spot that glow before he spots you, and you already have the upper hand.
What actually makes this fight dangerous isn’t just H1000 himself. AZ3 already stacks radiation exposure, AI patrols, and route pressure on top of every run. Adding a Warlord encounter on top of all that turns the core facility into a zone where you have to decide if the reward is worth the extra resource drain, not just whether you can win the fight.
Buy services for
Delta Force!
Get help with the parts of the game that take the most time. Browse available services or place a custom order.
Order
H1000 Spawn Location: Where to Find Him on AZ3
H1000 shows up in the underground core area, close to the turbine hall. He spawns reliably on Classified difficulty, so don’t expect a guaranteed encounter if you’re still running Easy or Normal to learn the map.
Here’s the part that trips people up: don’t think of this as walking to a marked spawn point. H1000 actively hunts high-threat players, which means your squad’s own behavior can pull him toward you. A loud, fast-looting squad that’s already fighting other players is far more likely to draw him out than a team quietly working the edges of the map. If you want to control when the fight happens, control how much noise your squad is making first.
How the AZ3 Reactor Shutdown Affects the H1000 Fight
This is the single biggest thing most players miss. AZ3’s emergency reactor shutdown isn’t just a separate objective that hands out bonus loot. It has a direct mechanical effect on H1000 before you ever engage him.
- Complete the shutdown, and his armor takes a hit before the fight starts, making the whole encounter noticeably easier
- Skip it, ignore it, or fail it, and radiation spreads across the map, stacking extra pressure on top of an already dangerous fight
If your squad has the numbers and the time, run the shutdown first. It’s the closest thing this encounter has to an easy mode, and it changes the fight enough that skipping it should be a conscious choice, not something you forget to do.
H1000 Boss Fight Phases: How Many Times You Need to Kill Him
The fight runs in three parts, and your squad needs three total kills to end it for good. Here’s the breakdown.
| Phase | What happens | What to do |
|---|---|---|
| 1 | First clone spawns | Treat it as a full fight, not a warm-up. Clear it before pushing further |
| 2 | Second clone spawns | Same threat level as phase 1. Reset your positioning, don't chain straight from phase 1 |
| 3 | Real H1000 appears | His full kit is live here: pistol, darts, and the kick. This is where most wipes happen |
Don’t burn every stun and flash on the clones. Save at least one for phase 3, since that’s where the fight actually turns dangerous and where a well-timed stun can save your whole squad.
H1000 Attack Patterns: Pistol, Tranquilizer Darts, and the Flying Kick
Every tool in his kit has a clean counter once you know what to look for.
On top of his kit, treat every other squad on AZ3 as a threat during this fight. Gunfire and grenades draw attention fast, and third-party squads love jumping a team that’s already mid-fight with H1000. A fight you were winning against the boss can turn into a loss against a fresh squad that heard the noise.
Best Squad Strategy to Beat H1000
- Fight from medium to long range behind hard cover. Never trade with him in the open
- Count his pistol bursts and punish the reload gap instead of forcing damage mid-burst
- Save stuns and flashes for phase 3 to shut down his aggression when it matters most
- Don’t loot mid-fight. He punishes squads that stop moving to grab items
- Heal and reposition between phases rather than pushing straight through
- Once he’s damaged, expect him to flank through side routes. Keep checking behind you, not just in front
- Split roles instead of everyone shooting from the same angle: one player bait-kites him around cover while the rest hold crossfire positions
- Post one teammate to watch the entrances. Third parties show up more often during this fight than almost anywhere else on AZ3
Squads that lose this fight almost always lose it the same way: someone pushes for a kill during his pistol pause, gets caught mid-reload themselves, and eats the flying kick before the team can react.
Solo and Duo Tips for the H1000 Fight
Running this fight with less than a full squad is possible, but it changes how you should play it.
- Lean even harder into cover. With fewer guns covering angles, you can’t afford to trade damage in the open at all
- Kite him through tight corridors where his flanking routes are limited, rather than open rooms where he can circle freely
- Clear your own dart stuns immediately, since there’s no spare teammate to bail you out if you get caught in the open
- Consider skipping the fight entirely if your gear isn’t ready for a solo attempt. The loot is good, but it isn’t worth losing a full kit over
If you’re set on soloing him, treat the reactor shutdown as mandatory rather than optional. The weakened armor makes a meaningful difference when you don’t have a full squad’s damage output backing you up.
H1000 Loot Table: Rewards, Red Key, and Respawn Timer
The payout is what pulls squads into this fight despite the risk. Here’s what’s actually on the table.
| Reward | Details |
|---|---|
| Red AZ3 key | Guaranteed drop. Opens one of the map's high-tier safes in the core area |
| Boss armor set | High-value gear drop tied to the kill |
| Armor-piercing pistol | His signature weapon can drop as loot |
| AZ3 passkeys | Can drop on some runs. Use them inside the match to open locked rooms, since a recent patch stopped players from extracting passkeys off the map |
Killing him guarantees gold-tier loot on top of the key, which is why geared squads keep coming back for repeat runs. If your squad wants to farm him, know that his boss set respawns roughly 10 minutes after each kill. That’s a tight enough window to plan a second run in the same session if your extraction route allows it, but expect other squads to have the same idea once word gets around that he’s back up.
Best Loadout and Gear for the H1000 Boss Fight
The fight happens inside an active radiation zone, so treat your loadout as gear for two threats, not one.
- Gas mask to manage radiation exposure during the fight
- Anti-radiation drugs as backup once your mask’s protection runs low
- Enough ammo to sustain three phases without needing to stop and loot mid-encounter
If you’re planning to run AZ3 regularly, it’s worth leveling the Decontamination Chamber upgrade at your Black Site. It raises your radiation tolerance and speeds up natural decay, which makes repeated H1000 attempts far more manageable over a full session instead of just a single run.
Buy services for
Delta Force!
Get help with the parts of the game that take the most time. Browse available services or place a custom order.
Order
Common Mistakes That Get Squads Wiped by H1000
- Rushing his pistol pause instead of waiting for the full reset window
- Letting a tranquilizer dart sit uncleared while the squad keeps pushing
- Standing still to loot mid-fight instead of finishing all three phases first
- Fighting him before shutting down the reactor when the squad had time to do it
- Ignoring the entrances and getting third-partied mid-fight
- Chasing him into open ground after he flanks, instead of holding a cleared angle and waiting
Every one of these mistakes comes from the same root cause: treating H1000 like a standard guard boss instead of a threat that actively punishes impatience.
