











Riven Tides landed on April 28, 2026 as part of Patch 1.26.0, and it’s unlike any other map in Arc Raiders. Every other map is static — you learn the layout once, run it a hundred times, and muscle memory does the rest. Riven Tides has a tidal cycle that floods and drains parts of the map mid-raid. Miss it, and you’ll find yourself chest-deep in water with a full inventory and no clean path to extraction.
The map covers three distinct zones: a decaying luxury hotel, an industrial port full of cranes and shipping containers, and an open coastline with buried loot you can only find with a metal detector. Each zone plays differently. Each rewards different builds and risk tolerances. And unlike Stella Montis, which throws you into the deep end immediately, Riven Tides has enough variety that a careful player can make money without ever firing at another Raider.
This guide covers where the loot actually is, how to move between zones without dying, and how Beachcombing works — because the game does a terrible job of explaining it.
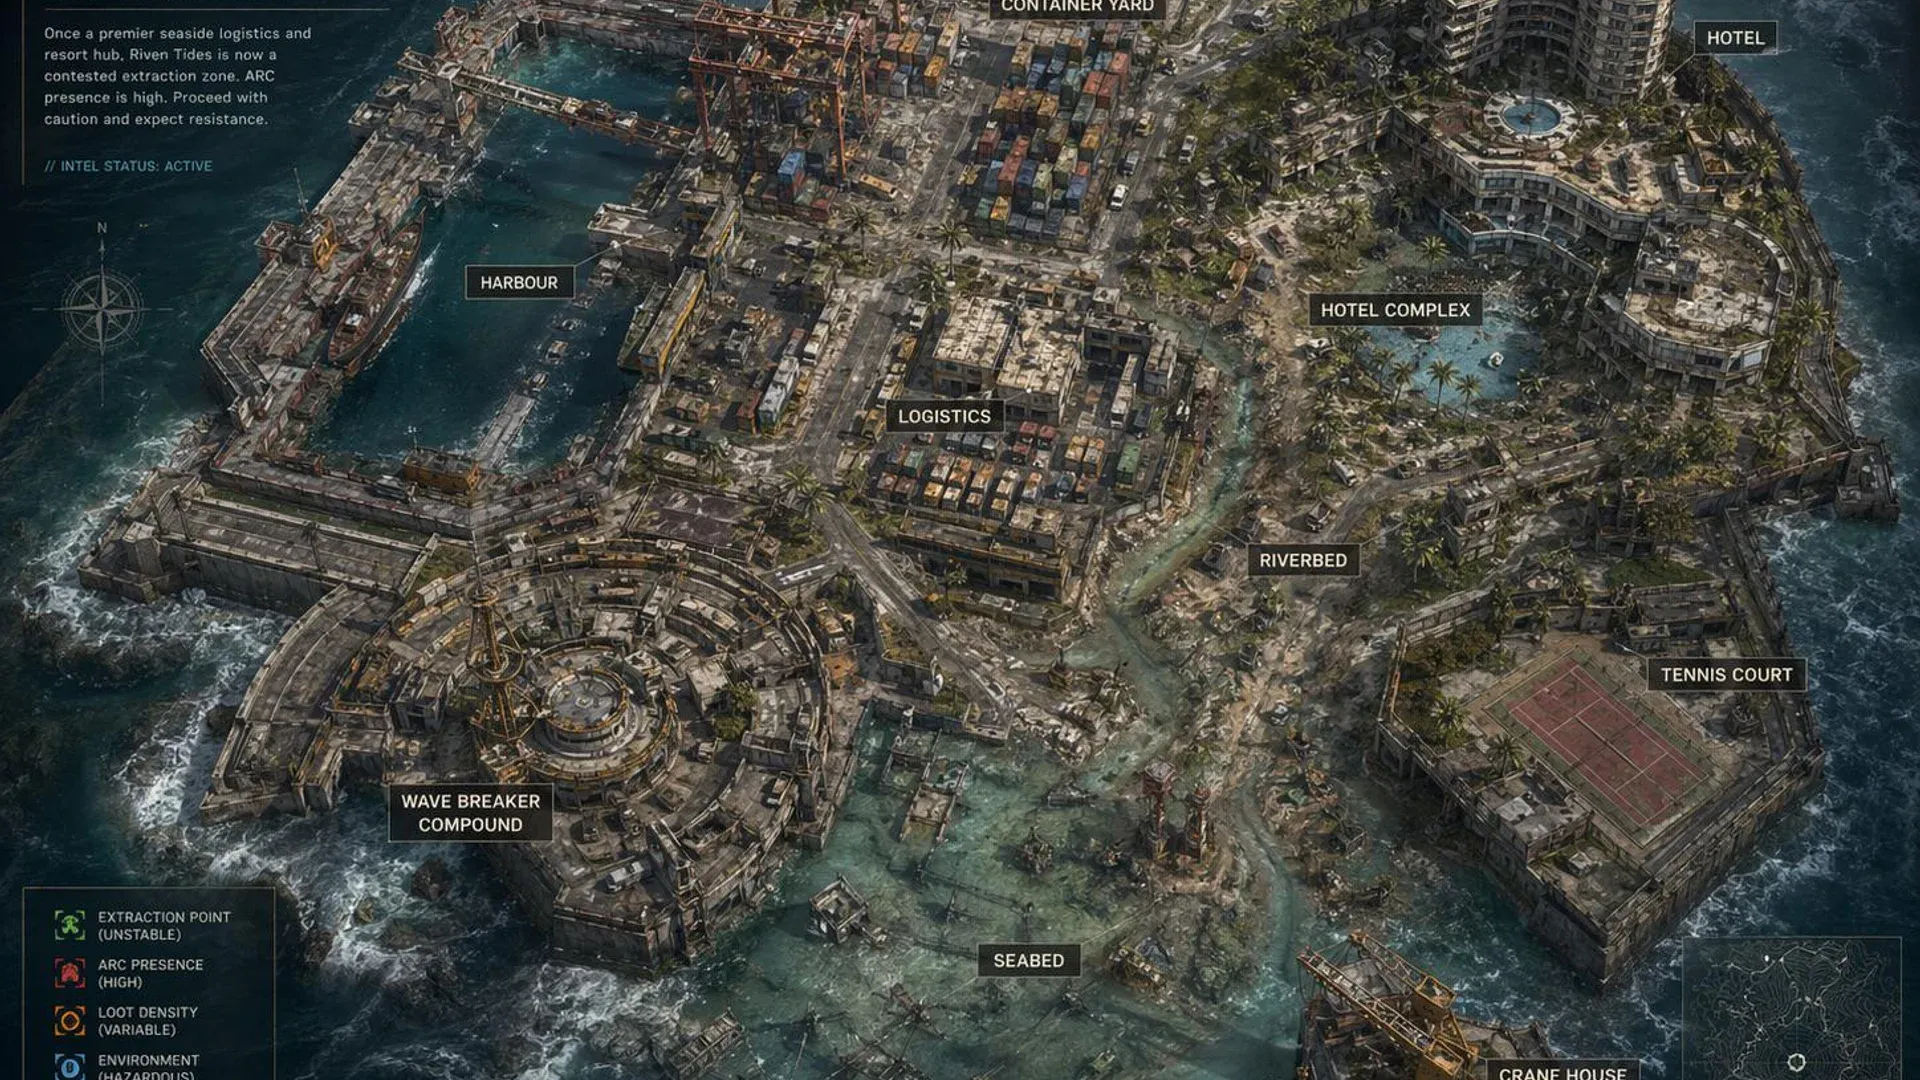
What Is the Riven Tides Map and How Do You Unlock It?
Riven Tides is Arc Raiders’ sixth map, set on the southern coastline of the Rust Belt just below Buried City. It’s smaller than most maps, which sounds like a downside but isn’t — less running means more looting per raid.
You unlock it by completing 20 raids on any other map. After that, it enters your rotation alongside standard, night, and Beachcombing conditions.
The map has three core areas:
- Panorama Azzurro Resort — a multi-story hotel with a pool deck, rooftop bar, and 8 keycard rooms
- Exodus Dockyard — Customs House, Stacking Yard, Port Authority, Crane House, and the Docks
- Open Coastline — exposed beach connecting both zones, plus the Seabed area to the north
The dockyard and hotel are close enough that you can rotate between them in under two minutes. That’s the whole map. The compactness is what makes it dangerous — player encounters happen faster here than on any other map.
Buy services for
ARC Raiders!
Get help with the parts of the game that take the most time. Browse available services or place a custom order.
Order
The Tidal Cycle: The One Mechanic You Need to Understand First
Every other mechanic on Riven Tides is secondary to this one. The tide runs on a fixed timer that’s visible on your HUD, and it changes which parts of the map are physically accessible.
- Low tide — coastal paths and submerged tunnels open up. This is when you can move freely between the hotel and the dockyard through beach-level routes, and when Beachcombing digs yield their best results.
- High tide — water floods the low-lying areas. Coastal shortcuts disappear. Players get funneled toward the elevated dockyard compounds: Customs House, Port Authority, and the Stacking Yard.
Two practical rules to burn into your muscle memory:
Check the tide before committing to beach routes. A path that existed five minutes ago might be underwater.
Never start extraction during a tidal transition. The movement penalty and flooding can cancel your extract entirely, and you’ll be standing still in an open area while other players rotate in.
If you’re new to the map, spend your first few raids just watching the tide timer. It will save you more loot than any weapon or skill build.
Riven Tides Zone Guide: Loot, Risk, and What to Expect in Each Area
Hotel Panorama Azzurro: Best Coins Per Minute on the Map
The hotel is the reason most players queue into Riven Tides. It has the highest loot density on the map — Commercial and Residential containers across multiple floors, 8 keycard rooms, and enough indoor fighting to keep PvP players busy while you clean out what they ignore.
The main mistake new players make is fighting over floors 1 through 3. Those get cleared in the first few minutes of every raid. The upper floors and the rooftop regularly go untouched. Go up first, then work your way back down.
For keycards, Hotel Keycard 107 drops from the Battening Down quest chain and opens a first-floor suite — decent, but not worth hunting specifically. Hotel Keycard 205 is the one you want. It spawns in bedside tables, cleaning closets, and sun loungers around the beachfront bar area on the ground floor. Room 205 is on the second floor and consistently drops high-value Commercial loot. Check the bar area every run.
Extraction: the Customs Elevator at Customs House is the closest exit from the hotel. Know exactly where it is before you start looting, not after your bag is full.
Stacking Yard: Industrial Loot and a Two-Player Secret Room
The Stacking Yard is the dockyard’s best farming spot for blueprints and weapon parts. It’s also one of the most vertical POIs in the entire game — cranes, shipping containers stacked four high, elevated platforms with sightlines across half the map.
Industrial and Exodus containers spawn consistently here. If you’re running low on mechanical parts or weapon components, this is your spot.
Two things to know:
- The secret room requires two players and several batteries to open. Solo players should skip it. Squads should absolutely attempt it — the loot inside is some of the best in Riven Tides.
- You’re exposed constantly. There’s no real cover on the upper levels. Someone with an Osprey on the rooftops of Port Authority can see everything you’re doing. Move fast, don’t stop in the open.
Bring a Hatch Key. There are two Hatches nearby and they’re your fastest emergency exit from the Stacking Yard if things go sideways.
Port Authority Building: The PvP Hotspot — Play It Smart
Port Authority is where players go to fight. It has keycard rooms with Classified Records and Secure Storage containers, weapon cases, and close-range corridors that favor aggressive players. It’s also the most contested spot on the map for the first 10 minutes of every raid.
The smart play: don’t push Port Authority early. Let other squads clash, waste their ammo, and thin each other out. After the 10-minute mark, the area is usually quieter and the best loot is still sitting in the locked rooms. Two keycards to look for here — Classified Records and Secure Storage — both spawn in containers around the building itself and in the Customs House tunnel network below.
Customs House: Low Loot, High Value as an Exit
Customs House has the lowest loot density of the main POIs. Mixed containers, tunnel access, a few mid-tier spawns. Most experienced players don’t stop here long.
What it does have is the best extraction point on the map. The Customs Elevator sits inside the building — in-cover, close to both the hotel and the dockyard. For any route that starts at the hotel, Customs House is where you end up. Learn the tunnels under it. They connect to the dockyard and give you a covered rotation path when the beach is flooded or contested.
The Seabed: Open Beach Loot — Only Worth Running During Beachcombing
The Seabed is the stretch of coastline north of Port Authority. Zero cover, full exposure to ARC patrols and player sightlines. During a normal raid with no Beachcombing condition, there’s nothing here worth dying over.
During Beachcombing, the loot density spikes. The buoy cluster north of Port Authority becomes one of the best farming spots per minute on the map, with washed-up containers holding Vaporizer Regulators, ship model collectibles, and occasional Aphelion Rifle drops. Skip it otherwise.
Riven Tides Loot Routes: Three Practical Paths by Playstyle
Rather than memorizing every container on the map, pick one route and run it until you know every spawn and exit cold.
| Route | Starting Point | Path | Extract | Best For |
|---|---|---|---|---|
| Hotel Money Run | Panorama Azzurro upper floors | Upper floors → rooftop → beachfront bar (keycard hunt) → Customs tunnel | Customs Elevator | Coins, trinkets, Commercial loot |
| Industrial Haul | Stacking Yard cranes | Crane top → containers → Crane House → Port Authority (after 10 min) | Dockyard Hatch | Blueprints, weapon parts, ammo |
| Beachcomber | Seabed (active condition only) | Buoy cluster → west coastline sweep → Customs House | Customs Elevator | Ship Models, rare drops, Avian Alarm progress |
The Hotel Money Run is the best starting point for players learning the map. It’s consistent, the extraction is clean, and the upper floors give you a read on where other players are dropping.
Beachcombing in Arc Raiders: A Complete Mechanic Breakdown
Beachcombing is the most misunderstood mechanic in Riven Tides because Arc Raiders doesn’t explain it. Here’s everything you need to know.
Check the matchmaking screen for the Beachcombing tag before you queue. If it’s not listed, buried treasure doesn’t spawn and your Dockmaster’s Detector does nothing. It rotates on an hourly schedule, same as other conditions.
How to Get the Dockmaster’s Detector
Three ways, ordered by reliability:
- Accept the “Shoring Up Defenses” quest from Apollo. The fastest method. He hands you a detector the moment you accept it — no completion required.
- Complete Stage 1 of the Avian Alarm project. Drop a bird trap next to one of the buoys in the Seabed. Reward is a detector plus 25 Raider Tokens.
- Loot one from containers in the Stacking Yard. RNG-dependent and not reliable. Use this as a backup, not a plan.
How to Use the Detector
The detector takes up a primary weapon slot. You’re scanning an open beach with one less gun. Other players know what you’re doing and where you are.
Step-by-step:
- Drop into Riven Tides while Beachcombing is active. Bring the detector in your loadout.
- Head to the Seabed — the north beach area, not the hotel beachfront.
- Hold the detector and activate it. It drains stamina while running.
- Orange light means something is nearby. Green light means you’re very close.
- Follow the faster beeping to triangulate. Interact with the sand mound to dig.
- Watch for traps. Some dig sites spawn mines or hostile surprises.
When the detector breaks, don’t drop it. It costs 3 batteries to repair back at Speranza — keep it and fix it after the raid.
ARC Turbine: What to Know for Raid Planning
The full Turbine boss guide is its own article, but you need two things for basic raid planning:
The Turbine spawns around the 15-minute mark. It operates both in the air and on the ground, and it’s significantly harder than anything else currently on Riven Tides. If you’re not geared to fight it, extract before that window or stay inside buildings — it struggles to follow players through tight indoor spaces.
If you are farming it for Avian Alarm Turbine Compressor drops, coordinate your squad around that 15-minute spawn. Pack traversal gear and Adrenaline Shots. The Stacking Yard crane tops give you the best angles.
Five Things to Know Before Your First Raid on Riven Tides
- Hilltop Hatch on the northern outskirts is the safest extraction on the map. It has nearby supply caches and low player traffic. Know it as your emergency exit.
- High ground wins every fight on this map. The Panorama Azzurro rooftop, dock cranes, and Stacking Yard platforms give you vision and clean disengages. Walking the beach low-ground without cover gets you killed fast.
- Don’t push Port Authority in the first five minutes. Wait out the initial wave. The locked rooms don’t despawn.
- Night Raid on Riven Tides doubles the Turbine spawn. More Turbines means more Compressor drops for Avian Alarm, but also more pressure. Run Night Raid only after you know the base layout cold.
- The tidal cycle affects your extraction, not just your loot route. Plan your exit before you start filling your bag.
Buy services for
ARC Raiders!
Get help with the parts of the game that take the most time. Browse available services or place a custom order.
Order
Riven Tides Map Tips: The Fastest Way to Learn the Map and Start Making Money
Riven Tides is compact, dense, and punishing when you don’t respect the tide. Once you do, it’s one of the most consistent money maps in the game. The hotel alone can fund a solid loadout per run if you hit the right floors and find the 205 keycard.
Start with the Hotel Money Run. Learn the Customs Elevator exit. Watch the tide timer. Once you can run that loop cleanly, layer in Beachcombing on the right conditions and start pushing the dockyard for blueprints. The rest follows.
For what to do with the Turbine once you’re ready for it, the Arc Turbine boss guide covers tactics, phase breakdowns, and recommended loadouts in full.
